Wednesday, May 15, 2019

Install Windows 95 in Oracle VM Virtual Box 6.0.8

This article is a followup to an article by toqabaqci titled . How to Install Windows 95 in VirtualBox on Windows 10 The reason for this post, is to clarify some of the procedure so the install will be successful. Why anyone would want to this, I'm not sure. I did it because I have always been interested in computers and Windows operating systems, starting with early DOS and I am somewhat nostalgic of that part of my life when I used Windows 95. I am going to reference toqabaqci's post, so you will need both if you want to complete the installation

First you will need to down a Windows 95 ISO and an image (.img) file of the Windows 95 3 1/2" installation floppy disk. The necessity for both files is not explained in the article, as it does not mention the 3 1/2 image file until you are in the middle of the install. Both can be had through a link at the bottom of toqabaqci's post Download Choose "Download All", and you will get both files. The "Download All" will be a zip files called "Windows 95.zip". Click on the file Extract>Extract all and you will get two rar files, the Windows ISO, "Windows 95 English.rar" and the 3 1/2" floppy disk image file, "Windows 95a.rar". These files will be extracted from their rar format, as an ISO and img file of the same names; I use 7-Zip. Regardless of what you use to extract the rar files,  The next bit of instruction is strange, but necessary. Wherever the files are extracted, leave then there. The Oracle VM software will not work if you move the files to different location than where they were extracted, (at least I know this to be true with the Windows 95.iso file; if you move them the process will stall. What causes this I don't know. 

If you have not already down so, you can download the Oracle VM Virtual Box (click on "Windows hosts"), either at the link I provided are the same link at the bottom of toqabaqci's post.  Toqabaqci's post uses Oracle VM Virtual Box ver 6.0.4, but ver 6.0.8 is the most recent and what available from the link. When you open 6.0.8 it looks different than the 6.0.4 version shown by toqabaqci's post, but it works the same. As you can below see the left panel is almost blank.
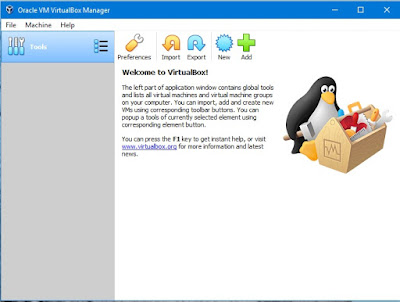


After clicking on  "New", the Create Virtual Machine window will open up.
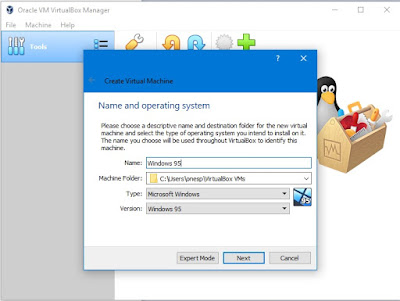
 

The "Name and operating system" portion (above) has an additional box showing the default location of the Virtual "Machine Folder". Leave this box as is as you will get a chance to assign the location of the Virtual Machine (VM) box later. Follow toqabaqci's post for Step 3 Memory Size, Step 4 Hard disk, Step 5 Hard disk file type and Step 6 Storage on physical hard disk. When you get to Step 7, this is where you assign the Virtual Machine location and file size. Like the Step 7 image, I put the VM Box on an external hard drive, which also is assigned H. The name of the VM box will be Windows 95.vdi, and you can place it anywhere you want. My Step 7 shows I assigned the location of the VM box to the H drive, in a folder named "Windows 95".  The software will create whatever folders are indicated in the box (don't create the folder beforehand or the software will tell you the folders already exist so the VM Box can not be placed there). You can also use the drop down to assign the drive and then type in whatever folders you want, keeping in mind the file Windows 95.vdi must at the end.
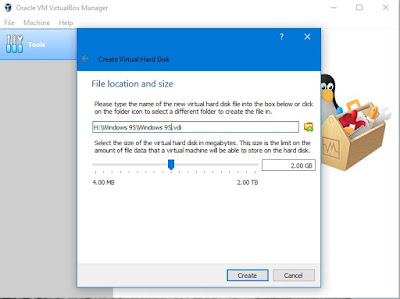

Once this is done press the Create button, leading to Step 8, Step9, Step 10, Step 11and Step 12. Step 13 shows Starting Windows 95... If you did everything right, the Step 14 command window will show a numerous line display starting with "CD ROM Device Driver for IDE (Four Channel Supported)", if however you get a display showing the only 3 lines

MSCDEX version 2.25
Copyright (C) Microsoft Corp. 1986-1995 All Rights Reserved

A:\>
 
Without "Drive R: = Driver Banana Unit 0",

then something was done wrong. This is where of you moved the extracted  ISO and Image files, the process will stall and you will have to start over, putting the files back where they were extracted, or re-extracting the files, before Step 9.

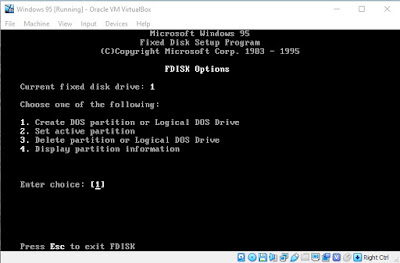
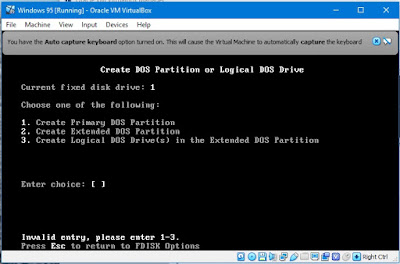
However assuming the command display looks the same Step 14,  continue to Steps 15. The fdisk used in step 15 is an another version than used with the current version of the software, rather than just pressing enter for  [Y] 1. "Create primary  DOS partition" and "making the partition" active,  as seen below the creating of a DOS partition and making it active is a 4 part operation (press enter for "1. Create Dos Partition or logical drive" [Y], followed by pressing enter 3 times on the next page. not the single operation shown in Step 16.


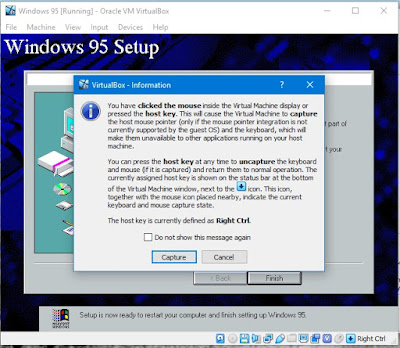
Next continue Steps 17-25. One thing worth noting is when you start using the mouse inside the VM Box with Windows 95, there will be a capture function. What this means is when you click on something inside the box, the below window will open up. When you press the "Capture" button, the mouse cursor will be trapped inside the VM box (there will also be some translucent gray banners across the top of the box, explaining what is happening). If you need to take the mouse outside the box again, you need to push the CTRL button on the right side of the keyboard. The grey banners I advised about can be closed by clicking an X on the upper right corner, when the mouse in the non-captured mode.  


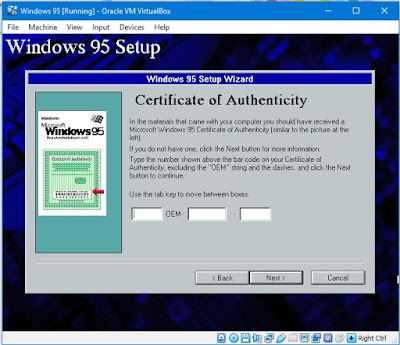
What was not mentioned or shown was after Step 25, Windows 95 will ask for a COA, while not a big deal, you will need to obtain an OEM COA. The easiest way to do that is to search eBay for Windows 95 and you will find numerous OEM install discs for sale. Why you may even find some images of the soft ware being sold, where the COA has not been obscured.


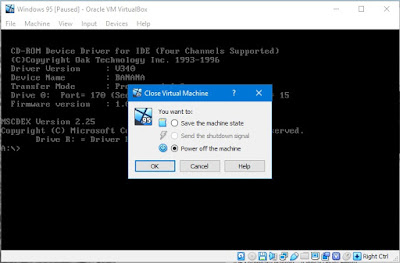
From here you follow Step 26-32. Step 33, while it's not a big deal, there is no reason to create a Startup Disk so you might as well click No, and skip Steps 34-36, while Step 37 runs it's course. Step 38, click "Finished", which leads us to Step 39, where I was stuck for hours. Step 39 shows clicking the Floppy Disk symbol under the VM Box, FYI it's a right click on the floppy disk symbol, and left click on "Remove disk from virtual drive". Two things worth noting here. After removing the floppy disk as shown and explained, Step 49 says "Click the OK button and close the virtual machine". First, when you click OK, the VM Box will return to the DOS screen seen in step 14. Have to fear, that is what it is supposed to do. Next there is no explanation on how to close the VM. The way this is done is to click on File>Close, this will open the below window. The default is "Save the machine state", however if you don't chose "Power off the Machine" you will not be able to change any of the settings later.
 

Once you click OK you will be at Step 41. The instructions say  to uncheck the floppy disk box, but this still leaves the "Optical" in the boot order ahead of the Hard Disk,  if not uncheck the VM will boot from the R: drive and you'll end up back as Step 14, so you will need to uncheck the optical disc image as well and then click  OK, which will bring you back to the Main Screen where you will push the Green Arrow Start Button.
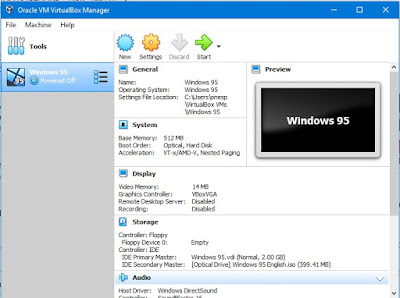


I did not experience the Step 43-44 issue so the VM went straight to Step 45-48.

Step 48 is very important so pay attention. At this point the CD-ROM  R drive R:\WIN95 has been disabled, so you will need to direct WINdows 95 setup to C: drive C:\WIN95 (this is why you copied all the R:\Win95 files to C:\Win95). The choice C:\Win95 is not in the drop down menu, so you must type it in. Once you complete Click OK and it will be clear sailing to complete the rest of Windows 95 install.


Saturday, May 4, 2019

AP misstates Papadopoulos timeline

Once again the left wing news media is reporting fake news, in this case the time line of Papadopoulos learning about Russia having Clinton emails. The AP article (05.04-2019 misstates the surveillance started when  Papadopoulos telling an Australian diplomat about the emails, followed by Professor Sefan Halper offering  Papadopoulos a speaking engagement in London.. In reality it started with the offer of the speaking engagement in London, where Professor Halper (an FBI informant) subsequently told Papadopoulos about Russia having the Clinton emails. Then, Papadopoulos met with the Australian diplomat (a supposed chance meeting in a bar) in a planned intelligence operation, where Papadopoulos told the Australian diplomat, the Russian/ Clinton email information  given to him by Professor Halper. The Australian diplomat then informed the FBI, Papadopoulos had told him about the Russians/ Clinton emails as planned. The entire episode was designed by the FBI, to manufacture false information to be used to spy on the Trump administration.

All of this is about to come out as a part of current DOJ and GSO investigations into the rogue FBI actions that tired to setup a silent coup of President Trump. The new media has been complicit with the Russia collusion witch hunt from the beginning, so they are continuing their disinformation campaign to try and coverup the corruption and treasonous activities of a handful of US intelligence administrators. One wonders why the news media felt it was so important to remove President Trump from office, that they abdicated their place in the American experiment in self rule, and joined forces with the tyrants.     

Saturday, April 13, 2019

Saving a Windows 10 Backup Image to a USB is Possible But a Waste of Time

The point of this post is not to instruct how to restore or backup Windows 10, which it does mention, but to point out how instruction have been giving, which allows you to save a Windows 10 system image on a USB, but it's useless because you can't restore from it.

Wouldn't it be nice if you could save a Windows backup/restore image file to a USB? Well you can https://answers.microsoft.com/en-us/windows/forum/windows_10-update/how-to-create-windows-10-system-image-on-a-usb/24e84aff-3916-4661-894b-f140005d3b9e?page=3, but it's a useless procedure. The reason is, while the procedure will let you save a WindowsImageBackup file to your USB, there is no way to use it  to restore your system because windows 10 will only restore from a hard drive; you can manually access your personal files from the WindowsImageBack file, but you can't rebuild your hard drive image, meaning you will need a new install of Windows 10, manually move your personal files to their respective folders, and reinstall all your programs/apps.

Rather than deal with such a mess, you have better choices, including saving the Windows backup image a real hard drive or use a Windows 10  utility (File History)  that save all your personal files in real time on a USB, so you can restore them at any time. Now you can't rebuild a hard drive with file history, so for a total reinstall you will still have to reinstall Windows 10, but File History will restore your personal files automatically from a USB afterward. There is a third way, which restores you Windows OS to a prior state/date. This was a great utility called "System Restore", which saves a previous configuration by date, when your OS was operating properly, and allows you to undo what ever changes where made to your computer to make it unstable, reverting back to to that earlier configuration. The problem with the is utility is 1) it is turned off by default in Windows 10 and even if you turn it on, I've not been successful using the utility with Windows 10, ending up with the dreaded error.

"System Restore did not complete successfully. Your computer’s system files and settings were not changed.

Details:
System Restore could not access a file. This is probably because an anti-virus program is running on the computer. Temporarily disable your antivirus program and retry System Restore.
An unspecified error occurred during System Restore. (0x80070005)

You can try System Restore again and choose a different restore point. If you continue to see this error, you can try an advanced recovery method. For more information, see What is recovery?"


I tried the restore in both safe mode and from a recovery disc with the same result. While I only used the utility in XP, it worked flawlessly, but I've read since windows 7, it has been problematic.  So I would not put my trust in this utility anymore

Sunday, April 7, 2019

Compaq d530 upgrade to Windows 7; fixing "Multimedia Audio Controller" error (Solved) and installing leagacy video drivers

I have a Compaq d530s computer (SFF case) with a Pentium 4 CPU and like many I decided to upgrade my XP computer with Windows 7. The problem with such an endeavor is a lack of Win 7 drivers for legacy hardware; in my case a NVIDIA FX 5200 graphics card and a legacy ADI sound on board audio controller. As mentioned  I determined the audio chip on the motherboard was an ADI Soundmax AC97 (the usual with d530 computers). After installing Win 7 the Device Manager showed an unknown device(yellow question mark) named  "Multimedia Audio Controller", meaning there was no driver for the onboard audio chip.  I searched for a Win7/Vista driver for hours* until I found this driver (the key is to know the audio onboard chip number; in this case AC97)  , "ADI Soundmax AC97 Integrated Driver" at  https://adi-soundmax-ac97-driver.jaleco.com/download also known as the "SP44472" driver. I ran the driver program and bingo, I now have sound.

After hours of searching, I found drivers that worked for both. Although I tried numerous NVIDIA driver installers for win7 and Vista, They all failed, mostly because they could not identify my video card. However I did find one thread from NVIDIA that recommended the following; find XP drivers for your NVIDIA video card and load them. The result will be the program will load the XP drivers (175.19_geforce_winxp_32bit_english_whql), but the program will stop at some point to say you're using the wrong Windows OS or it could not find the hardware, or something similar, however the files will remain on your hard drive, in my case c:\NVIDIA. Next, go the Device Manager, d-click on the "Display adapter" and then d-click on the pnp generic driver that is currently installed. Click on the "Driver" tab, click on Update and chose, "Browse my computer for driver software" and click the "Browse" button at the end of the "Search for drivers in this location" pane. Browse to the location of the XP drivers and click "Next" at the bottom left of the "Update Drivers" window, and in the following window, choose to install the driver; it should load the driver and your video adapter will come alive.

* several websites recommended, first going into the bios and disabling the PCI "Intel Audi Device" (Advanced/PCI Device/Intel Audio Device), which is not present on the motherboard. Re-boot the computer, go to the Device Manager and  delete the "Multimedia Audio Controller" unknown device (yellow question mark). Once the "Multimedia Audio Controller" device is deleted, click on the action tab in the Device Manager, and choose to look for new hardware. I tried this, but the"Multimedia Audio Controller" device showed up again, however I left the the Intel Audio Device disabled. After I installed the correct drivers, I went back and enabled the Intel Audio Device just out of curiosity to see if it would affect the Soundmax drivers, but it did not. (but I went back and disabled it again to make sure the IRQ was available.

Hopefully this will help anyone still holding onto their d530 XP computer and upgrading it to Windows 7.

ADI SoundMax AC97 Integrated Source: https://adi-soundmax-ac97-driver.jaleco.com/download Source: https://adi-soundmax-ac97-driver.jaleco.com/downloadS

Saturday, March 23, 2019

Windows 10 Edge "Error Code: INET_E_RESOURCE_NOT_FOUND" (SOLVED)

After refreshing Windows 10, I found Edge, Mail and Windows Update, were not working. With MS Edge, I was receiving “There was a temporary DNS error. Try refreshing the page. Error Code: INET_E_RESOURCE_NOT_FOUND.”  and when I tried to add my email account to Mail, I received a 0x80190001 error. There are numerous fixes on the internet, for theses issues, including doing  a Windows 10 update Update (which I did), but none worked for me.

The fix I found can be identified if you go to Windows Settings/ Network and Internet, which will open with a menu of the left side, showing "Status", which is the top choice. If the "Network status" says there is no connection (this example shows Network status is connected) ,


even though you are connected to your internet provider and if you check "Wi-Fi"  (the menu item below "Status")

then the problem is the Windows Network needs to be reset so it can find your internet/ Wi-Fi connection.  Back to the "Status" (the first picture) the last choice below "Change your Network settings", is "Network Reset".  After clicking on it, the "Network Reset" window will open and there is a "reset now" button, that will reset your network after your PC is restarted. Be advised you will have to enter your WiFi password after you have reset your network. If it works, when you return to the Network and Internet Status, you will see your Network status is now connected to the internet. and Edge, Mail and Update will now work.  Hope this helps..